How to Send a Document(s) to the community?
** This feature has now been upgraded. You can now use Send Announcement and Send Message to send attachments.
Summary/Goal: To send documents to recipients in Pilera. You can send documents to specific recipient types, located in different streets, buildings, or floors.
Step by Step:
Testing and Delivery Confirmation
Note: The send document functionality will send the document and content in an email format to your recipients who have email specified as their communication preference. Sending a document through this functionality will not add the document to the web portal. In order to add the document to the web portal for your staff and residents to log in and open documents, navigate to the Resources tab and click Document Library. Learn more about how to upload documents in Pilera here.
Conclusions
The send document feature is a great way to inform your community members about important community information and send them documents for their reference. The feature provides flexibility in who you can send the documents to and to which locations.
Step by Step:
- CLICK ON the Communications tab and click Send Documents.
- Enter in a subject and the content of your email.
- You can send the document to all communities or specific locations within your community. When you select the Specific Locations option, you can send the document email to a specific street, building, floor, or unit.
- Specify the types of recipients to receive this email. Click "Change" to select recipients.
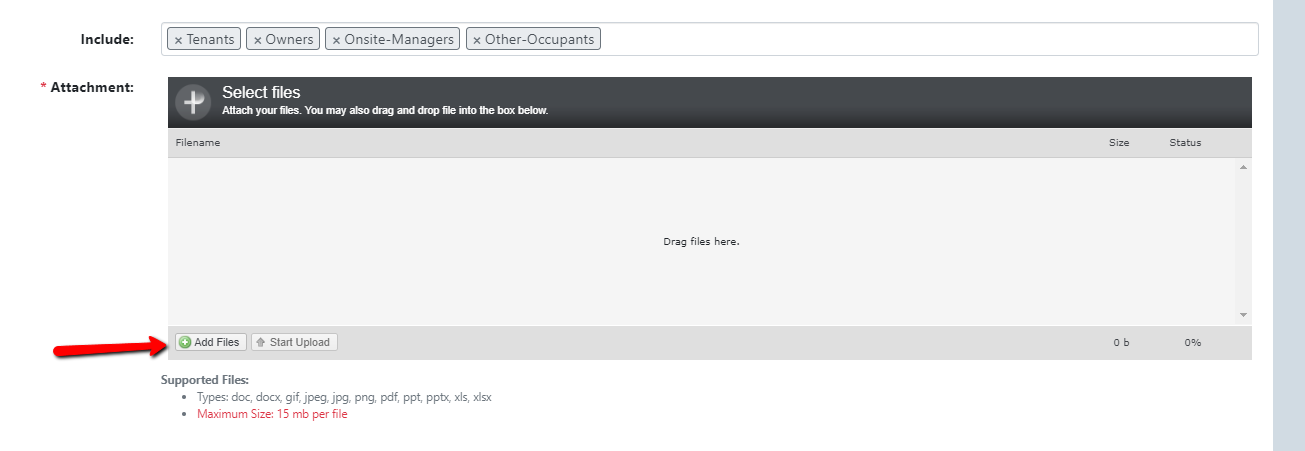
- To include your attachments, you can either browse for the files or drag them into the box as shown here. Pilera supports multiple types of files that include Microsoft Office documents, PDFs, and several image files (jpeg, jpg, png, and gif).
7. When you're ready to send, click "Show a Preview of Recipients" or "Send without a Preview". Then click "Preview and Send".
Testing and Delivery Confirmation
- Your document email has now been sent. To view information on delivery confirmation, click on the Communications tab and click Message Center.
- Your latest message will show at the top of the page. Click "Detail" to see all recipients and the email delivery status. To view all emails sent out with documents through the Send Document functionality, select Document Library in the drop-down.
Conclusions
The send document feature is a great way to inform your community members about important community information and send them documents for their reference. The feature provides flexibility in who you can send the documents to and to which locations.
Related Articles
How Can I send a Document Library document to my community?
How to send a new document (uploaded in the New Document Library) to my community. Summary: Document Library files can easily be sent out to your community with the New Document Library feature. You can even select which occupant groups (owners, ...How can I attach a document to a message?
*New Feature* Overview: Managers can now attach a document in the "Send Message" and "Send Announcement" modules (as opposed to using the "Send Document" module). Using this new feature improves the user experience with added features like being ...How do I add my document library documents into my Community Website?
How do I add documents from Document Library to the Community Website? Last Updated: Jun 10, 2019 05:15PM EDT Summary/Goal: To add documents from the document library (newer version released in 2018) to the community website. This article will also ...How Email Replies Work in Pilera
In this article, you will learn about how the resident and manager email reply system works in Pilera. What are email replies? Residents can reply to managers' emails sent from within the portal and the status will be tracked within Pilera's message ...How can I add documents into the New Document Library?
Adding Documents into the New Document Library In order to add documents into the New Document Library you will need to have the correct Role permissions. Those permissions include: Company Admin Role Company File Library Manager Community Manager ...