How do I create a Task and access the Task Management Dashboard
Summary/Goal:
Task Management provides a simple way for board members and managers to collaborate on a variety of community responsibilities. The purpose of this help article is to discuss how the task management product works.
Brief:
First, make sure that employees who are going to be using the task management product are given the Task Admin role in User Roles Administration. Then, navigate to Tickets and Task Management to start creating and handling tasks.
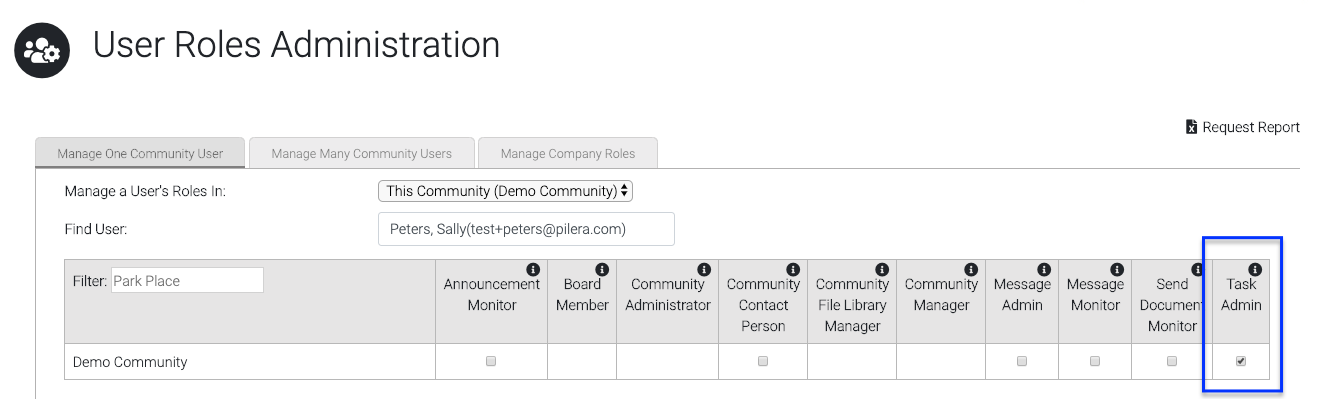
Delegating the Task Admin role
Company Admins, Community Managers, and Task Admins only can create and manage tasks throughout the communities they manage. To set up this role, navigate to User Roles Administration and assign employees the Task Admin role. If the employee is a Company Admin, they will automatically have the ability to create tasks. For more information on how to set up roles, visit our User Roles Administration page.
Create categories and subcategories
Before you can start to create tasks, you’ll first need to add relevant categories and subcategories, and then map them to the community or multiple communities. Navigate to our custom categories article to get started.
Add a new task
Update comments or status
How to use the dashboard:
The dashboard allows you to search on a variety of criteria to display results, which then can be downloaded for your offline use. Managers can filter by status (any, new, acknowledged, etc), state (open, closed or deleted), category, sub-category, the manager or board member the task is assigned to, date range, modified date, and/or subject. Company admins or managers that are linked to multiple communities can also filter by all the communities they manage.

Task Management provides a simple way for board members and managers to collaborate on a variety of community responsibilities. The purpose of this help article is to discuss how the task management product works.
Brief:
First, make sure that employees who are going to be using the task management product are given the Task Admin role in User Roles Administration. Then, navigate to Tickets and Task Management to start creating and handling tasks.
Delegating the Task Admin role
Company Admins, Community Managers, and Task Admins only can create and manage tasks throughout the communities they manage. To set up this role, navigate to User Roles Administration and assign employees the Task Admin role. If the employee is a Company Admin, they will automatically have the ability to create tasks. For more information on how to set up roles, visit our User Roles Administration page.
Create categories and subcategories
Before you can start to create tasks, you’ll first need to add relevant categories and subcategories, and then map them to the community or multiple communities. Navigate to our custom categories article to get started.
Add a new task
- Hover over the Tickets tab in the navigation and click on “Task Management”.
- Click on “Add Task Management”.
- Add a subject and description.
- Schedule a due date for the task.
- Select a category and subcategory.
- Set a priority for the task.
- You can choose whether to notify board members of the task once it’s been created.
- You can also set board member permissions for the ticket. It’s important to note that board members who have been set up as managers in the system will by default have View, Comment & Edit capabilities. Here we define the permission options:
- Hide - Board members will not see the task.
- View - Board members will have access to seeing the task.
- Comment - Board members can collaborate on a task by adding comments.
- Comment & Edit - Board members can comment and also edit the above fields in a task.
- Add any relevant attachments to the task. Keep in mind these specifications:
- File extensions that are accepted: pdf, doc, docx, xls, xlsx, jpg, jpeg, png, gif, ppt, and pptx.
- The maximum size per file is 15 MB.
- Once you have completed adding the task details, click on “Add”. The task has now been created and you’ll be able to track all actions performed on the task.
Update comments or status
- Find the specific task that you want to update. Click on the “i” or “Information” icon.
- Click on the “Add Comment/Change Status/Assign” button.
- You can update the status, reassign the ticket to another manager or board member, notify task managers and/or board members of the update, or add a comment.
- Click “Submit” to update the task.
- In the “Show” field, you can either display “Comments” only or “All Events”. The “All Events” action is like an audit trail - it will show every update made to that task.
How to use the dashboard:
The dashboard allows you to search on a variety of criteria to display results, which then can be downloaded for your offline use. Managers can filter by status (any, new, acknowledged, etc), state (open, closed or deleted), category, sub-category, the manager or board member the task is assigned to, date range, modified date, and/or subject. Company admins or managers that are linked to multiple communities can also filter by all the communities they manage.
Related Articles
Welcome Message Dashboard
Summary/Goal: This article reviews the welcome message dashboard feature and how to send welcome messages in batches. This dashboard shows statuses for email, last sent, and last logged in. Let's go over each status: Email - This column displays ...How to Create a New Ticket Alert (Discussion Board, Work Orders, Support, ARCs, and more)
Managers can now customize messages that will display on each type of ticket in Pilera: Activity Logs Architectural Change Requests Rule Violations Support Tasks Work Orders Discussion Board Residents will be able to see this message when they ...How do a make someone a Community Moderator - Community Discussion Board
Discussion Board - Community Moderator Role Pilera's newest feature - the Community Discussion Board allows for occupants and community managers to create topics/communications to share with the community. The Discussion Board is accessible by ...How to Manage and set up Board Members in Pilera (video)
This video goes over the best practices for managing Board Members in Pilera.How can an occupant add a Unit or Common Area Work Order
How can I create a Unit or Common Area Work Order? Residents can create their own Unit or Common Area Work Orders. Once the ticket is created an e-notification will be sent to management and you can view/check the status of the ticket, and even ...