Welcome Message Dashboard
Summary/Goal:
This article reviews the welcome message dashboard feature and how to send welcome messages in batches. This dashboard shows statuses for email, last sent, and last logged in. Let's go over each status:
How do I edit the welcome message content before sending it?
Can I have welcome messages sent automatically?
If your community or management company integrates with any of our accounting partners, then you can have welcome messages sent automatically to occupants once the automated sync is complete. To have this setup for your community or management company, email support@pilera.com. Note that automated syncs are performed every 48 hours.
Conclusion
The welcome message is a great way to introduce your management team to your community members. It then becomes essential to make the first impression a really good one. Through the welcome message dashboard, you can do just that by determining which occupants are yet to have an email address in the system, creating custom messages, and sending the messages without a worry. You can monitor the message analytics over time and ensure that occupants are receiving the emails to access the portal.
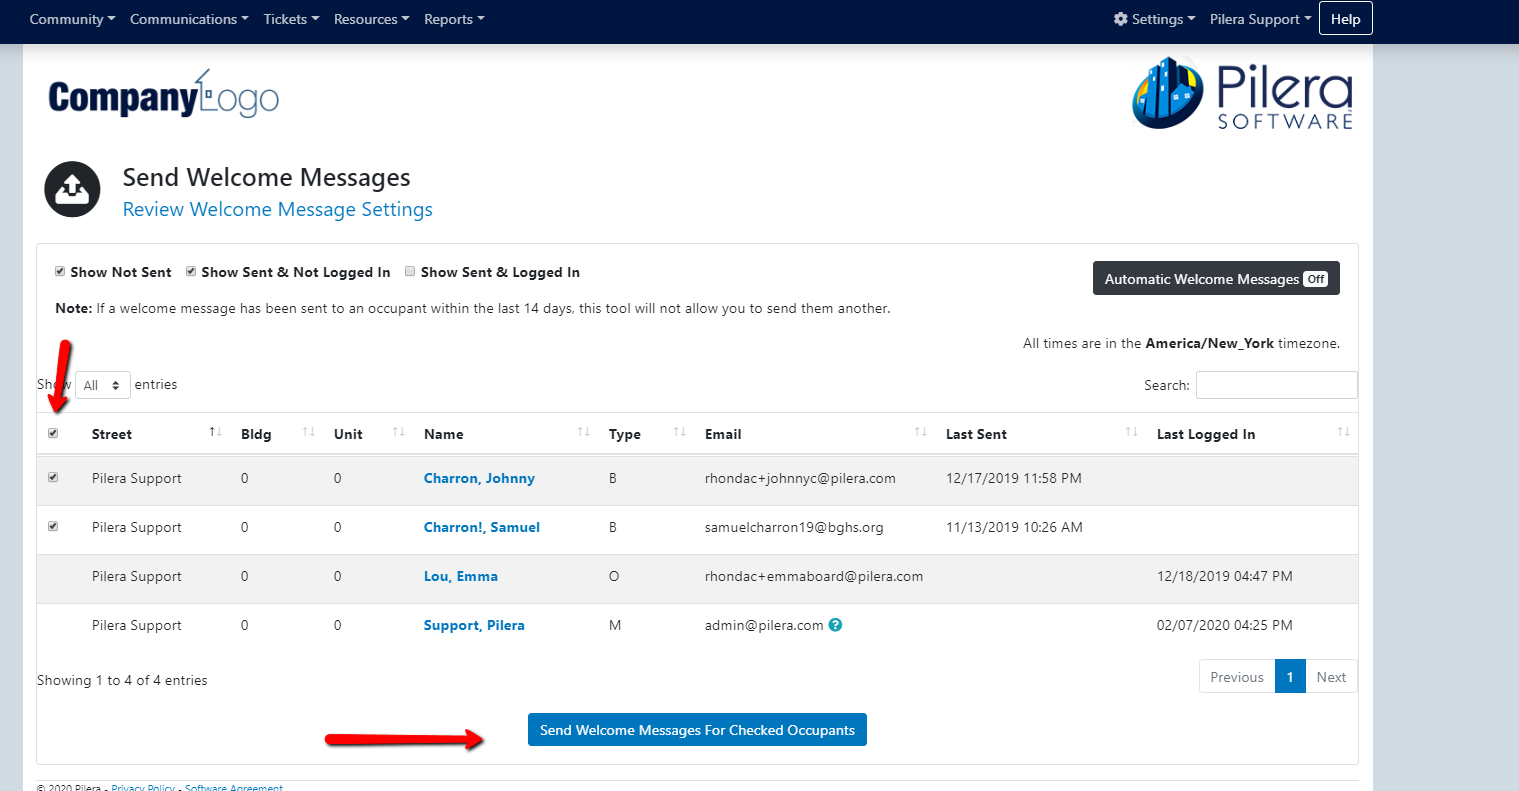
This article reviews the welcome message dashboard feature and how to send welcome messages in batches. This dashboard shows statuses for email, last sent, and last logged in. Let's go over each status:
- Email - This column displays whether or not an occupant has an email address specified as their communication preference. You can also see at a glance if any email addresses provided have bounced, been dropped, or unsubscribed. Click on the icon to view more details.
- Last Sent - The date and time when the most recent welcome message was sent.
- Last Login - The date and time when an occupant last logged into Pilera.
- Navigate to the Communications Tab and click "Welcome Messages".
- Managers can toggle among the following options or they can select all options at the same time.
- Occupants who have not been sent welcome messages.
- Occupants who have been sent welcome messages but have not yet logged in.
- Occupants who have been sent welcome messages and logged in.
- Occupants who have not been sent welcome messages.
How do I edit the welcome message content before sending it?
- Under Settings, click on "Welcome Email Settings"
- Use the editor to create or change the content for your welcome message. You can type in your content directly into the editor. Or, if you are familiar with HTML coding, navigate to Tools and click on Source Code to copy and paste your custom code.
- When complete, you can either click on "Send Me a Preview Welcome Message" to preview your email or click on "Update Settings" when you are done.
- Toggle on one or all of the options above (occupants who haven't been sent messages, occupants who have been sent and haven't logged in, or occupants who have been sent messages and logged in).
- To send a welcome message to all recipients, click on the checkbox above the table, next to "Street". To send a welcome message to only specific occupants, click the checkbox next to each individual name.
- Click "Send Welcome Messages for Checked Occupants". Upon clicking send, you will be prompted to confirm that you want to send messages to the specific number of occupants. Click "Yes".
4. You will be directed to the submission success page. Depending on the size of the community and how many welcome messages you are sending, this could take some time (allow for approximately 10 - 20 minutes for larger communities). After submitting, you can still navigate to the other pages in Pilera and continue working while the messages are being sent in the background.
If your community or management company integrates with any of our accounting partners, then you can have welcome messages sent automatically to occupants once the automated sync is complete. To have this setup for your community or management company, email support@pilera.com. Note that automated syncs are performed every 48 hours.
Conclusion
The welcome message is a great way to introduce your management team to your community members. It then becomes essential to make the first impression a really good one. Through the welcome message dashboard, you can do just that by determining which occupants are yet to have an email address in the system, creating custom messages, and sending the messages without a worry. You can monitor the message analytics over time and ensure that occupants are receiving the emails to access the portal.
Related Articles
Welcome Message Templates
Summary/Goal: To provide managers with numerous options for the welcome message email they will send to owners and tenants once they join a condo, apartment, or homeowners association. This article will also provide some helpful tips that our ...Ticket Work Order Email Message
Summary/Goal To show how managers can apply custom email messages to their work order notifications to residents. What is a Ticket Work Order Email Message? Managers can add custom text to the header of their work order email messages. Each ...How to Send a Welcome Message
Send a welcome message to new occupants in your community. Step-by-step: CLICK ON THE ‘Communication’ tab and SELECT the ‘Welcome Messages’ button click on it. 2. IN THE NEW WINDOW make sure to select the ‘show not sent’ checkbox at the top of ...Understanding the Message Center, and seeing a history of your community communications
Summary/Goal: To provide managers with a better understanding of their communication method efforts through the Message Center. Step by Step: Accessing the Message Center: After logging into Pilera, you will be directed to the Occupants Page. CLICK ...How to add images to your Messages and Knowledge Base Articles (New Feature released 2021)
Overview: You can now easily add images to your communications using the Send Message or Send Announcement Feature. You can also add images to your KB articles also. This article will outline those steps. Adding an Image to your communications ...