Creating Quick Add Comments for Tickets
Summary/Goal:
In this article, we will review how to Add Quick Add comments for Work Orders (although you can follow these same steps to create quick add comments for other ticket types, like Activity Logs). This will provide managers with an in-depth understanding of Work Order Comment templates, how to create them, and apply the templates for multiple communities for staff to use. Quick add comments are great for standard responses that companies like to use when a work order ticket is received.
What is a template? A template is a predefined response that can be applied to ticket comments across all your communities.
Step by Step:
Administrative Roles:
Before a manager can start to use the templates, they will need to be assigned the Template Admin role in Pilera. The Template Admin role can manage templates in the communities that they are assigned/linked to. Note that the only Company Admins can assign managers the Template Admin role. Please see our help article on assigning Roles for help with roles.
Accessing Templates:

Adding Comments to a Work Order Ticket: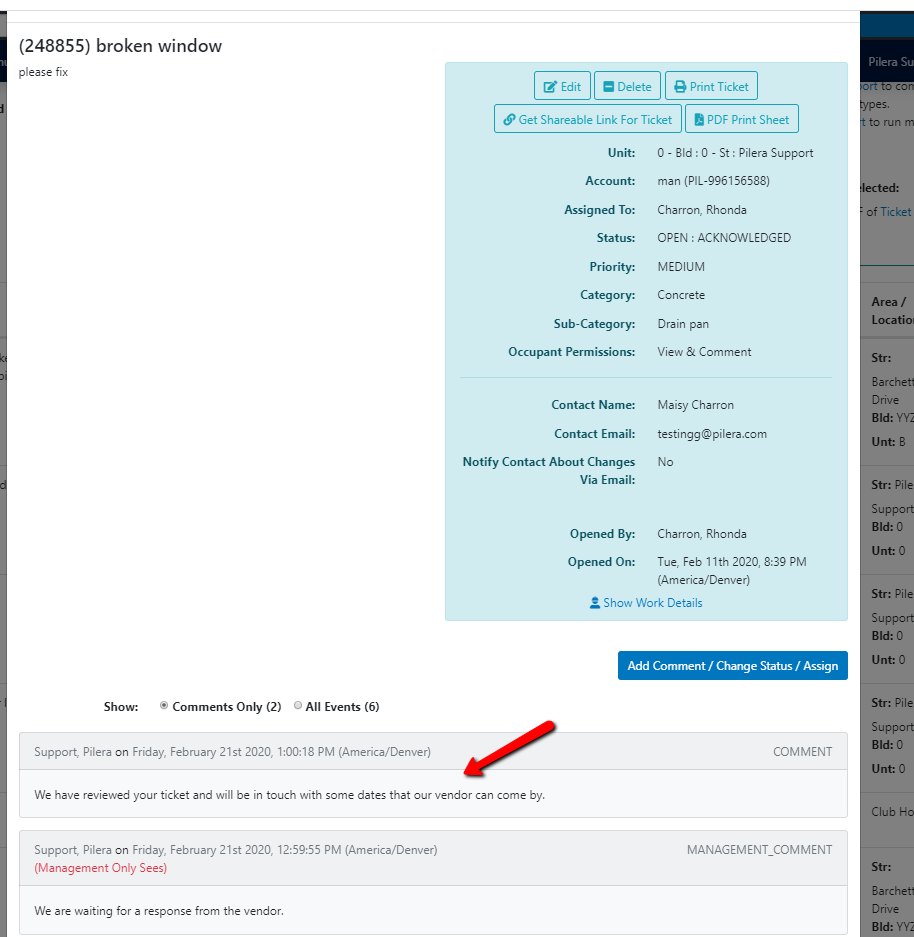
Conclusion: The ticket Comments template helps your company save time in updating tickets across your portfolio. These predefined responses eliminate the manual input of redundant information as managers and staff manage maintenance projects across all their communities.
What is a template? A template is a predefined response that can be applied to ticket comments across all your communities.
Step by Step:
Administrative Roles:
Before a manager can start to use the templates, they will need to be assigned the Template Admin role in Pilera. The Template Admin role can manage templates in the communities that they are assigned/linked to. Note that the only Company Admins can assign managers the Template Admin role. Please see our help article on assigning Roles for help with roles.
Accessing Templates:
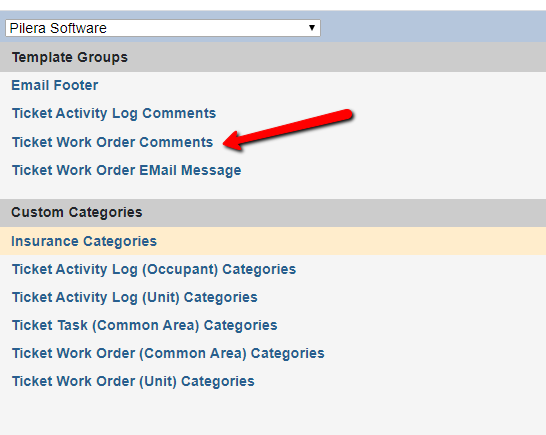
- Navigate to the Settings drop-down at the top of your screen and click on "Templates". A new browser window will open with the Templates administration page, as seen below.
- CLICK ON "Ticket Work Order Comments"
3. Click on the "Add Comment" button to create a new work order comments template.
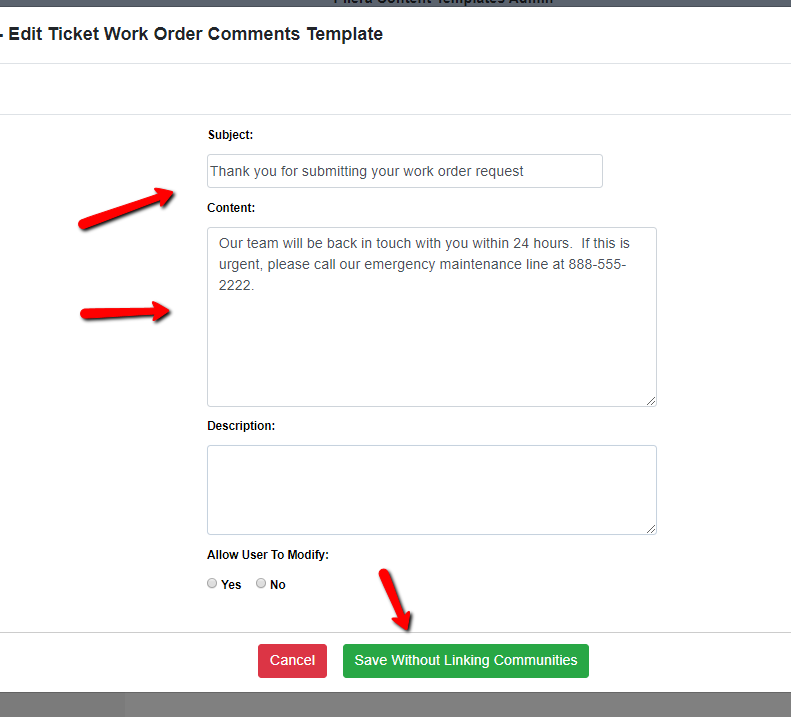
4. Fill in the information on the form. Click Save Without Linking Communities. The next step is sharing those comments with your other communities.
5. Click on the Communities tab to select which communities this work order quick add ticket response should show up in. Once done, click "Ok".
Adding Comments to a Work Order Ticket:
- Now that you have created work order template responses, it is now just a one-click process to add the predefined response to your work order ticket.
- In the manager portal, navigate to the Tickets tab and click on Work Orders.
- Click to edit any work order that has already been created by clicking the " i " at the end of the work order line.
- Click on the "Add Comment/Change Status/Assign" button.
- In the Quick Add Comment drop-down, click on the predefined response that you want to be shown in the comments. The comment, which is the content box that you have filled in the Templates area, will appear. We also show whether the comment can be modified or not. In the sample shown below, the comment cannot be modified and thus the textbox is greyed out. If the Template Admin has specified that the comment can be modified, managers updating the ticket can modify the comment in the textbox.
- In this screen you also have the option to notify the resident and managers via email with the comment. Check off "Yes" to notify if you would like the email to go out.
- Click the "Submit" button.
- The comment will now display in the ticket history as shown below.
Conclusion: The ticket Comments template helps your company save time in updating tickets across your portfolio. These predefined responses eliminate the manual input of redundant information as managers and staff manage maintenance projects across all their communities.